Terranova Screen Saver for Windows
Version 1.2
by John Walker
July 31st, 2006
 The Terranova Screen Saver for Windows 95/98/Me and NT/2000/XP uses
the technique of fractal forgery to synthesise images of
planets, star fields, and cloudy skies. Every image is unique; you
could run this screen saver for millions of years without seeing the
same image twice. You can configure the rate at which images change
and whether images appear at random positions on the screen to avoid
burning in the phosphor (the Prime Directive for screen savers) or are
centred on the screen. You can optionally display the date and time.
The Terranova Screen Saver for Windows 95/98/Me and NT/2000/XP uses
the technique of fractal forgery to synthesise images of
planets, star fields, and cloudy skies. Every image is unique; you
could run this screen saver for millions of years without seeing the
same image twice. You can configure the rate at which images change
and whether images appear at random positions on the screen to avoid
burning in the phosphor (the Prime Directive for screen savers) or are
centred on the screen. You can optionally display the date and time.
The Terranova Screen Saver is available exclusively for 32-bit Windows
systems such as Windows 95/98/Me and Windows NT/2000/XP. At the
time of its original release in early 1999, this was one of the most
computationally intense screen savers in existence (other than those
deliberately designed to perform some background computation in
addition to the screen saver function). On machines slower than a 90
MHz Pentium it may be unacceptably sluggish. If you wish to use it on
a slower machine, try setting the “Mesh size” in the
Advanced Configuration dialogue to a smaller value and selecting a
longer interval between images.
Downloading and Installation
After you've downloaded the program archive, extract the files
it contains with
Info-ZIP
or a compatible archive extract program, then copy it to the directory
where screen savers lurk on your system, as follows:
Windows 2000/XP
copy Terranova.scr c:\windows\system32
Windows 95/98/Me
copy Terranova.scr c:\windows\system
Windows NT 3.x
copy Terranova.scr c:\winnt\system32
Once you've installed the screen saver in the system directory and
verified that it can be selected, you can delete the
terranov.zip and Terranova.scr files from
your download directory.
All prior releases remain available.
Configuration
After installing the screen saver, select it by using the Settings
item on the Start menu to launch the Control Panel, then click the
Display icon to launch the Display Properties panel. Click the Screen
Saver tab and click the Screen Saver drop-down list to display the
screen savers installed. If you've copied Terranova.scr into
the proper directory, “Terranova” should appear in this
list; select it. If it doesn't appear, double check that you've
copied it to the correct directory and file name.
The Terranova screen saver will run with reasonable defaults for most
systems without the need for configuration. The Settings dialogue
does, however, permit you to control a variety of items to adapt the
screen saver to your own preferences.
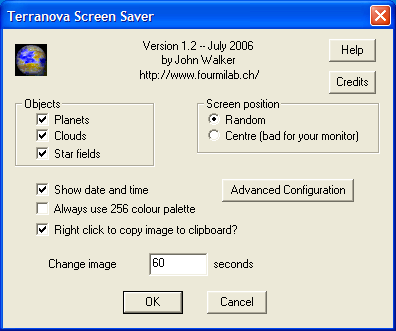
- Objects
- The Terranova screen saver can generate images of planets, clouds,
and star fields. By default, it randomly chooses the type of
image, showing an average of six planets for each cloudy sky
or star field. If you'd like to suppress certain kinds of
images, uncheck the corresponding boxes.
- Screen position
- The whole reason for a screen saver is to keep a constant
image from being “burned in” on the phosphor of
your monitor's screen. To achieve this goal, by default the
screen saver shows successive planet images at random
positions on the screen. If you're more obsessed with
symmetry than the health of your monitor (or you have a
non-CRT display that's not vulnerable to phosphor burn), check
“Centre” to display each planet centred on the
screen.
- Show date and time
- If checked, the date and time are displayed in discreet dark
blue type at the top of the screen. If you've selected random
screen position, the date and time will shift horizontally
with every image update, appearing above the planet in images
containing one.
- Always use 256 colour palette
- Planet images, and to a lesser extent star fields, contain a
very large number of different colours (you did
notice that the stars are subtly coloured, just like in the
real sky, didn't you?). If your computer's graphics hardware
is limited to 256 colours, full colour images are displayed by
performing colour quantisation to reduce the number
of distinct colours in the image to 256, chosen to preserve,
as closely as possible, the appearance of the original image.
If your computer is equipped with “high colour”
(15 or 16 bits per pixel: 32768 or 65536 colours) or
“true colour” (24 bits or more per pixel)
hardware, full colour images can be sent directly to the
screen without the quantisation step. If this box is checked,
images are quantised even if the hardware is capable
of displaying them directly. The principal reason for this
option is to permit testing the quantisation algorithm on
computers equipped with full colour hardware, but there's
another reason you might want to use it. “High
colour” (15 or 16 bit) displays really don't have enough
resolution (only 5 or 6 bits) per colour to render smooth
changes in shade over large areas of an image. Clouds, and
planetary oceans and icecaps have many such smooth gradations
in shading. Such images, viewed on high colour displays, may
exhibit unattractive and distracting “banding”
effects due to the limited colour resolution of the display,
and often actually look better when reduced to 256 colours.
So, if you have a high colour display and are bothered by
banding artifacts, you might give this a try. Colour
quantisation is a relatively time-consuming process: it can
take several seconds to quantise the colours in a 1024×768
pixel full colour image on a machine in the 133 MHz Pentium
class, but compared to the computation performed to generate
the images, it is not a major contributor to the screen
saver's consumption of CPU time.
- Right click to copy image to clipboard?
- Standard behaviour for screen savers is to terminate on any
mouse or keyboard activity. Every now and then the Terranova
screen saver may produce an image so striking you may wish to
save it, for example, to use as your screen background image.
If this box is checked (as it is by default), clicking the
right mouse button copies the image currently on the screen to
the clipboard, whence you can paste it into a paint program
and save it as a file in whichever format you prefer. Since
mouse motion (beyond a small increment) causes a screen saver
to terminate, right clicking to save an image requires a
special touch. It's best not to grab the mouse, but simply
place your finger above the right button and tap it. It's
possible your tap may move the mouse enough to exit the screen
saver, but by then the image should already be on the
clipboard. Uncheck this box to disable image saving; a right
click will then leave the screen saver.
- Change images every n seconds
- A new image will be generated and displayed at the given
interval. Of course, if your computer takes longer than the
specified number of seconds to generate an image, it will only
be displayed after its generation is complete.
Advanced Configuration
The Advanced Configuration button in the main Settings panel displays
a dialogue which permits you to specify the parameters which govern
the generation of images. Most of these quantities are specified as
ranges within which the screen saver randomly selects a value
for each successive image; if you'd like to fix a given item, simply
set its maximum and minimum to the same value.

The following table gives the default minimum and maximum values
for each variable, the limits within which you may specify them,
and a brief discussion of the effects each has on the generation
of images.
| Parameter |
Default |
Limit |
Description |
| Min. |
Max. |
Min. |
Max. |
| Fractal dimension |
2.0 |
2.7 |
1.0 |
3.0 |
Controls the roughness, or scale of detail in the
terrain for planets or for clouds in the sky. Lower values produce
smoother results, while high values may be close to completely
chaotic. Different ranges of fractal dimension can be specified for
planet and cloud images. |
| Power factor |
1.0 |
1.5 |
0.1 |
4.0 |
Sets the “power factor” (or exponent) used
to scale values representing terrain elevation (for planets) or
density (for clouds). The result of the image synthesis is an array of
elevation values between 0 and 1. A non-unity power factor
exponentiates each of these elevations to the specified power. For
example, a power factor of 2 squares each value, while a power factor
of 0.5 replaces each with its square root. (Note that exponentiating
values between 0 and 1 yields values that remain within that range.)
Power factors less than 1 emphasise large-scale elevation changes at
the expense of small variations. Power factors greater than 1
increase the roughness of the terrain and, like high fractal
dimensions, may require a larger Mesh size and/or higher screen
resolution to look good. Again, you can set the power factor range
independently for planet and cloud images. |
| Ice level |
0.2 |
0.6 |
0.0 |
1.0 |
Sets the extent of the polar ice caps. The default range produces ice
caps similar to those of the Earth, varying from ice age to
interglacial periods. Smaller values reduce the amount of ice, while
larger settings create more prominent ice caps. Sufficiently large
values, in conjunction with small settings for Glacier Level (try 0.1)
create “ice balls” like Callisto and Europa. |
| Glacier level |
0.6 |
0.85 |
0.0 |
1.0 |
This item controls the extent to which terrain elevation
causes ice to appear at lower latitudes. The default value range
makes the polar caps extend toward the equator across high terrain and
forms glaciers in the highest mountains, as on Earth. Higher values
make ice sheets that cover more and more of the land surface,
simulating planets in the midst of an extreme ice age. Lower values
tend to be boring, resulting in unrealistic geometrically-precise ice
cap boundaries. |
| Star Density |
50 |
75 |
0 |
1000 |
In planet and star field images, field stars are placed
randomly with a density given by this item. The probability a star
will be placed on a given pixel is the value of this item divided by
1000. |
| Star Colour |
100 |
150 |
0 |
1000 |
Controls the degree of colour saturation of stars in
planet and star field images. The default values yield stars which
resemble the sky as seen by the human eye from Earth's surface. Stars
are dim; only the brightest activate the cones in the human retina,
causing colour to be perceived. Higher values approximate the
appearance of stars from Earth orbit, where better dark adaptation,
absence of skyglow, and the concentration of light from a given star
onto a smaller area of the retina thanks to the lack of atmospheric
turbulence enhances the perception of colour. Values greater than 250
create “science fiction” skies which, while pretty, don't
occur in this universe. |
| Star Cluster Number |
-3 |
1 |
-10000 |
10 |
In addition to “field stars” governed by the
Star Density parameter, up to ten star clusters may appear at random
positions in star field and planet images. The number of clusters in
a given image is chosen randomly based upon this item. Negative
values are equivalent to zero, permitting you to configure star
clusters to appear only in a given fraction of images. |
| Star Cluster Density |
10 |
100 |
0 |
500 |
The density (enhancement of star placement probability)
at the centre of a star cluster is chosen between the limits given by
this item. Larger values result in dense globular clusters like
M13,
while smaller values simulate
open
clusters. |
| Star Cluster Diameter |
10 |
30 |
0 |
200 |
The diameter of star clusters is given by this item, as
a percentage of the width or height of the screen, whichever
is smaller. |
| Mesh size |
512 |
128 |
1024 |
Planet and cloud images are synthesised by generating a
Gaussian random spatial frequency map which is transformed into a
table of elevations with an inverse Fourier transform. This item (a
power of two chosen from the list box) gives the size of this array,
or mesh. Larger arrays permit higher spatial frequencies and
elevation resolution and thus produce images with more detail when the
Fractal dimension is large. However, the computation time and memory
required to generate an image increase as the square of the mesh size,
so smaller mesh sizes are preferable for slower computers. The
maximum mesh size of 1024×1024 requires 8 megabytes of RAM (each
value in the mesh is a single precision complex number) and can take
almost forever to evaluate on a slow machine. |
Frequently Asked Questions
- Why Terranova?
- Terranova is Latin for “New Earth”
which, if our descendants aren't any more imaginative than
their ancestors, will probably be the name given to
innumerable planets as terrestrial life expands throughout the
galaxy. I like to think of the planets it produces as the
view from the bridge of a starship in orbit around a habitable
planet many light years from Earth, the star fields memories
of the long voyage across the void, and the blue skies and
clouds as a welcome sight for the first arrivals stepping out
of the lander onto their new home under a distant star. The
Terranova
Planet of the Day
has been a popular feature of my Web site since 1995; now this
screen saver lets you make your own new planets as frequently
as you wish.
- I installed your screen saver on our server, changing images
every ten seconds, and now my pointy-haired boss is screaming the
server takes forever to respond. What's the problem?
- Whoa! Computationally-intense screen savers like this one are
for single user machines that don't run background
tasks. Generating fractal forgery images takes a great deal
of CPU time, and still more if the image must be quantised for
display on 256 colour graphics hardware. Servers should run a
“blank the screen” or other non-animated screen
saver. If you must run this on a server or machine running
background jobs, choose a long interval between image changes,
such as ten minutes. How frequently do you look at the
screen, anyway?
- I just noticed that small cloud images tile
perfectly when used as a screen background. How did you
manage that?
- This property falls right out of the spectral synthesis
algorithm used to create the images. The mesh used to
generate the clouds is produced by an inverse Fourier
transform of a random frequency map. Fourier transforms
express complex waveforms as a sum of a series of sine
waves of given frequency, magnitude, and phase. Since the
sine function is periodic (it repeats itself over and
over at an interval given by the frequency), any image
produced from a table of sine waves will also repeat
itself, and thus the cloud images match edge to edge
when tiled onto the screen.
Other Windows Screen Savers at this Site
- Bullets riddles your screen with bullet holes.
- Craters saves your screen by slamming asteroids into it.
- Earth shows our planet from various viewpoints in space.
- Home Planet shows day and night worldwide.
- Millennium counts down to doomsday for ill-conceived software.
- Sky shows the sky above any location on Earth.
- Slide Show shows images and plays sound files.
Source Code
Experienced C programmers who wish to modify the screen saver or
simply read the code to see how it works may download the source
code. You're welcome to use this source code in any way you like (the
third-party JPEG image library included must be used pursuant to the
redistribution requirements described in its directory in the
archive), but absolutely no support is
provided—you're entirely on your own.
When you unzip the archive, be sure to use a utility which preserves
long file names and specify the option to maintain the directory
structure in the archive; the JPEG image processing library is kept in
its own subdirectory, with the resulting library file linked into the
screen saver. For reasons of history and nostalgia, the screen saver
project and executable are named forgescr—rename
forgescr.exe as Terranova.scr after building the
program.
The source code for this screen saver incorporates Fourmilab's
Scream SaverTM technology. Because
they turn off the cursor and seize control of the screen, mouse, and
keyboard, screen savers can be hideously difficult to debug; you can't
see the debugger since the screen saver is monopolising the
screen, and any mouse motion terminates the screen saver, bringing the
debugging session to a screeching halt. Scream Saver avoids
these difficulties by allowing you to test an unmodified screen saver
in a regular application window which can coexist with a debugger.
Scream Saver is a main program which completely emulates
scrnsave.lib, allowing you to exercise a screen saver within
an application window (in either normal or preview mode) or in full
screen mode. The screen saver's settings dialogue can be activated by
a menu selection. To build with Scream Saver, simply
uncomment the definition of SCREAM_SAVER at the top of the
file screamsv.c and rebuild. (It's best to do a
“Rebuild All” since Monkey C often screws up dependencies
between program files and libraries, and you may get link errors when
you change the setting of SCREAM_SAVER.) Launch the
Scream Saver build as you would any application. Your screen
saver can be tested in its various modes from the “Test”
menu. Scream Saver only terminates the screen saver on a
mouse click or keypress within its own window—mouse motion does
not cause it to exit. This allows you to run your screen saver under
a debugger or utility like
Bounds Checker
as you would any other normal application. Scream Saver is in
the public domain—you're welcome to use it in your own screen
savers and pass it along to other developers. (One detail: Scream
Saver allows you to start and terminate the screen saver any
number of times in one execution session. This never happens when a
screen saver is invoked by Windows. If your screen saver doesn't
clean up after itself so it can be restarted, it may fail if you start
it more than once in a Scream Saver session. You have two
options: either fix the screen saver so it is restartable or re-launch
Scream Saver for each debug session. The Terranova Screen
Saver is restartable.)
References
The mathematical background and details of the algorithms used
in this program are given in sections 2.4 and 2.5 of the
following book, which contains a wealth of information on
other fractal image synthesis techniques.
Peitgen, Heinz-Otto, and Dietmar Saupe, eds.
The Science Of Fractal Images
.
New York: Springer Verlag, 1988.
ISBN 0-387-96608-0.
Credits
The code used to display full colour images on screens limited
to 256 colours employs the excellent colour quantisation module
from the Independent JPEG Group's
JPEG Software
which implements
Paul Heckbert's median-cut algorithm with back end
Floyd-Steinberg error diffusion. The jpeg directory
contains a complete copy of the JPEG package although this screen
saver uses only the colour quantisation component.
The Independent JPEG Group's JPEG Software
is the work of Tom Lane, Philip Gladstone, Luis Ortiz, Jim
Boucher, Lee Crocker, Julian Minguillon, George Phillips, Davide Rossi,
Ge' Weijers, and other members of the Independent JPEG Group.
The authors make NO WARRANTY or representation, either express or implied,
with respect to this software, its quality, accuracy, merchantability, or
fitness for a particular purpose. This software is provided “AS IS”, and you,
its user, assume the entire risk as to its quality and accuracy.
This software is copyright © 1991–1996, Thomas G. Lane.
All Rights Reserved except as specified below.
Permission is hereby granted to use, copy, modify, and distribute this
software (or portions thereof) for any purpose, without fee, subject to these
conditions:
- If any part of the source code for this software is distributed, then this
README file must be included, with this copyright and no-warranty notice
unaltered; and any additions, deletions, or changes to the original files
must be clearly indicated in accompanying documentation.
- If only executable code is distributed, then the accompanying
documentation must state that “this software is based in part on the work of
the Independent JPEG Group”.
- Permission for use of this software is granted only if the user accepts
full responsibility for any undesirable consequences; the authors accept
NO LIABILITY for damages of any kind.
These conditions apply to any software derived from or based on the IJG code,
not just to the unmodified library. If you use our work, you ought to
acknowledge us.
Permission is NOT granted for the use of any IJG author's name or company name
in advertising or publicity relating to this software or products derived from
it. This software may be referred to only as “the Independent JPEG Group's
software”.
We specifically permit and encourage the use of this software as the basis of
commercial products, provided that all warranty or liability claims are
assumed by the product vendor.
|
|

|
by John Walker
Version 1.0: January 1999
Version 1.1: August 2004
Version 1.2: July 2006