 Solar System Live Help Solar System Live Help
There are two basic techniques for viewing stereo pairs: one involves a stereoscope (an optical device with lenses for both eyes which focus different images on each), and the other is a mental trick called crossed eye fusion which requires no hardware assistance. The images used by the two techniques are incompatible: when the images are printed left to right, a stereoscope delivers the right image to the right eye and the left image to the left eye. The crossed eye fusion technique reverses this, so in order to use a set of printed images prepared for one technique with the other, it's necessary to cut out the images and swap them left for right on the page. With computer-generated images it is easy to swap them, so Solar System Live offers stereo pairs in both “cross-eye” and “wall-eye” formats.
Learning crossed eye fusion requires you to upload a small amount of software into your brain. About 80% of the population is able to learn crossed eye fusion (about 92% can perceive stereo with the aid of a stereoscope), but the technique requires some patience to learn. Once learned, it's like riding a bicycle—you'll never forget it and you can use it whenever you want without any conscious effort. Some people who can't manage the crossed eye trick are able to fuse stereoscope (wall-eye) images by directing their attention beyond the screen until the two images fuse. If you have trouble with the crossed eye technique described below, you might want to give that a try.
To learn crossed eye fusion, you need to learn to decouple two separate functions your brain usually links together: differential lateral aim of the eyes and focusing of the lens. Normally, as you look at objects at different distances from your eye, two things happen. First, you adjust your eyes from fully parallel aim (to look at an object at infinity) to extreme toe-in (to look at an object as close as you can focus). These two physiological functions are completely independent, but the brain learns to couple them because in normal viewing a given focus will always be correct for a certain degree of eye-cross.
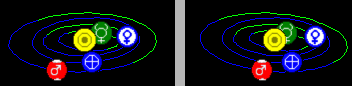
The best way to learn crossed eye fusion is to start at a time when you are well rested, relatively free of stress, and have ten minutes to practice without distractions or noise. (Did I just lose my audience?) Here's a small stereo pair to practice with. The smaller the image, the less you have to cross your eyes to bring the two frames into alignment, so it's best to start out with smaller images when you're learning.
Before beginning, you might want to practice crossing and uncrossing your eyes (gently, not to any extreme) and (if you can), focusing and defocusing your eyes while staring at a distant object (such as a picture on the wall in front of you). If you have trouble doing this, don't worry—the point is to get an idea what the two actions feel like.
Concentrate on picture pair, tilting your head until the two images are dead-level with respect to one another. Place your index finger at the border between the two pictures with your fingertip at the bottom of the pictures. Now keep your attention on the fingertip as you very slowly move it from the screen toward your nose. Notice what's happening to the two pictures on the screen: they're moving together as you cross your eyes to track the fingertip. Notice that they are also going out of focus as your eye's lens adjusts to keep your fingertip in focus. When your finger is about 20 cm from your nose (this will vary quite a bit based on your interocular separation and the distance from your eyes to the screen), the two blurry images in the background will merge with the left image overlapping the right one. At this point, you'll perceive three images: the left, the fused combination of the left and right, and the right. You might want to practice this fusion several times by slowly moving your finger back and forth from the screen to your nose as you observe the action of the images you perceive.
Now it's time to go for it. Bring the images into fusion by focusing on your fingertip and hold your attention on the fingertip for about 10 seconds. Be sure the fingertip is below the merged image, not overlapping it. Now focus your attention on that merged image. Tell your brain that a tiger may spring from it any second and that you have to see it clearly. As you shift your attention, the lenses of your eyes will refocus on the page while remaining crossed correctly for viewing the finger. The first few times you try this, you'll probably “lose it” and the images will float away. If as you attempt to refocus the finger separates into two images, you've probably got the finger too close or too near; when it's right, both the finger and the merged image will stay single—the only change will be them drifting in and out of focus.
When you are able to focus on the merged images, slowly remove the finger from the field of view and practice holding the fused images together and in sharp focus. If your head is not level, the two images will fail to merge vertically: just tilt your head until they come together. After you've held the images together for a few seconds (it takes 30 seconds for some people, especially when first learning the technique), suddenly a datastorm traverses the corpus callosum and Mars pops out of the screen and Mercury peeks around the far side of the Sun. After you've become accustomed to crossed eye fusion, you'll be able to do it instantly, on larger and more complicated images, without any need for the finger-tracking trick.
Return to Solar System Live Other Help|
|