 Cellular Automata Laboratory
CelLab for Windows
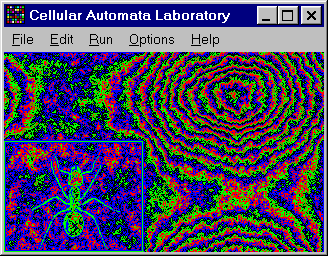 CelLab for Windows is a cellular automata simulator which
runs under Microsoft Windows 3.1,
Windows 95, and Windows NT. CelLab for Windows
is 100% compatible with the JC simulator
for DOS--it uses the same rule, pattern, palette, and
own code files and produces the same results. Running under
Windows allows CelLab to provide some capabilities absent in
JC, including the ability to display the simulation at any
resolution, control its speed, cut and paste
patterns to and from other applications, and generate a sound
track to accompany the simulation. Windows menus and dialogue
boxes replace the keystrokes used
by JC, simplifying many operations.
The File Menu
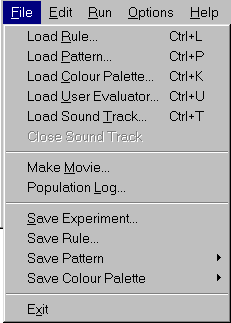 The File menu allows you to load and save all rules, patterns, palettes,
own code evaluators, and other files associated with a simulation. Most
of the items display a standard Windows open or save file dialogue,
which you use to specify the location and name of the file.
This item loads a compiled rule definition (.jc) file.
If the rule requests a specific pattern, palette, and/or own
code evaluator, and those files are present in the directory
containing the rule definition file, they will be automatically
loaded. If the .jc file is an "experiment" saved
with the File/Save Experiment menu item or from JC, the
pattern, palette, and own code embedded in it are automatically
loaded.
This loads a pattern (.jcp) file into the simulator. Any
of the pattern file formats (ASCII or binary, compressed or
uncompressed) can be loaded. Loading a pattern
from a .jcp file does not change the color palette; if the
pattern has a corresponding color palette, you must use the
File/Load Colour Palette item to load it. In addition
to CelLab's .jcp pattern files, you can also
load patterns from Microsoft 8-bit uncompressed .bmp
files. When a .bmp file is loaded, its palette is
loaded at the same time. If the .bmp file is smaller than
the 320×200 pixel simulator screen, it is centered within the
screen area; if the .bmp is larger, a 320×200 pixel
area is extracted from the center of the image.
A color palette (.jcc) file is loaded into the
simulator. Color palettes may be in either the ASCII or binary
formats used by JC, and are completely compatible.
Even though on Windows we can set the intensity of
the primary colors from 0 to 255, to maintain compatibility with
JC, our color palette definitions use intensities
of 0 to 63, which are automatically translated into the Windows
range when a palette is loaded.
A User Evaluator, or own code
program is loaded to replace the built-in evaluation code in CelLab. An
evaluator can either be an
assembly-language own code program
compatible with JC or an evaluator DLL
written in C, developed expressly for use with CelLab for Windows. Regardless
of the type of evaluator, it should have a file type of .jco, DLL
evaluators being renamed to bear this type. CelLab determines which kind
of evaluator is being loaded by examining the file header and invokes it
accordingly.
If you'd like musical accompaniment to the execution of the simulator,
use this item to select a genre of music
appropriate to the rule and pattern. When you start
the simulation running, the sound track will play and when the
simulation is halted, the sound track will wind up shortly
thereafter. Obviously, to hear the sound track you need a sound
board with MIDI capability. This feature was included with the
intention of eventually allowing generation of music based on
the computation of cellular automata, but we never got around
to doing that. So, at present, it's just a random sound track.
When the simulation
is running at the fastest speed, the music sometimes sounds
oddly syncopated since Windows doesn't always get around to
playing notes on time. (This
seems to be more a problem on Windows NT than on Windows 3.1 and
95.) Use the Options/Dashboard menu item
to slightly slow down the simulation if this bothers you.
If you've chosen a sound track and want to make it shut up,
click here. Loading a new sound track automatically closes the
old one. You can't change or close the sound track while the
music is playing; wait until it ends
before using one of the sound track menu items.
If you have a slow computer or are using a complicated own
code evaluator which does a great deal of computation for each
cell update, the simulation may run so slowly you can't
get a feel for its dynamics. By making a movie of the
simulation, you can later replay it with a separate
movie player program and see the simulation run at the
frame rate of the movie player, not the original generation
speed. Movies of simulations are also useful when you'd like
to post results of your experiments on the Web without requiring
those who view them to have their own copy of CelLab
to examine your work.
Choosing Make Movie displays a dialogue which allows you to
specify the name of a Microsoft movie (.avi) file.
After you've selected the file, any subsequent screen updates will
be written as frames in the movie file. The File/Make Movie
menu item changes into "Stop Movie Recording" while
recording. Selecting this item completes generation of
the movie file and ends recording.
In some work with cellular automata, for example simulating predator-prey
relationships in an ecosystem, the pattern of cells is not as important
as the population histogram: how many cells are in a given state
at successive moments in time. The Options/Show
Histogram menu item allows viewing a population histogram on the
screen as the simulation runs, but for serious analysis it's better to
get a historical log in a file you can process with separate analysis
software.
This item displays a dialogue which lets you specify the name of a
population history log (.jch).
By default, a log entry is made only when you
request one with the Run/Dump Population
menu item or the shortcut key Ctrl-Z, but you can request
dumps at a regular intervals with the Options/Population
Log menu item.
The format of
population log files is given in the File Formats
chapter.
Save Experiment allows you to create a composite .jc
file which contains the rule, pattern, color palette, and
assembly-language own code evaluator (if any) currently loaded
into the simulator. This allows you to restore the entire state of the
simulation at a later date or, by sending the saved experiment to
another user, permit them to see your experiment just as you were
running it. Due to limitations in the architecture of Windows,
user evaluator DLLs cannot be embedded in experiment files; instead,
a request to load the evaluator is included and you must remember
to supply the requested evaluator along with the saved experiment.
A saved experiment is loaded with
File/Load Rule--the load process
determines that the file is an experiment and restores the pattern,
palette, and own code embedded in it.
Save Rule creates a .jc file containing the current rule
definition. This is primarily useful when you've discovered an
intriguing random rule or wish to save a rule file created by
an Algorithmic Rule
specification. If your rule table generation program creates
uncompressed .jc files, as is the case for our
BASIC language rule program
utilities, you can save them in compressed form by loading
and saving to the same file name.
You can save the current pattern to a .jcp file
choosing, by submenus, binary or
ASCII
encoding and
compressed or uncompressed format. Binary
compressed
pattern files are the most compact so this is usually
the best choice unless you want to process the map with
another program. You can also save the pattern as an
8 bit per pixel Windows bitmap (.bmp) image file,
which will also contain the color palette in effect when the
image was saved.
You can save the current color palette in either
binary or
ASCII formats by
choosing the corresponding item from the submenu.
The simulator exits. If you're creating a movie or population log,
be sure to close them before exiting.
The Edit Menu
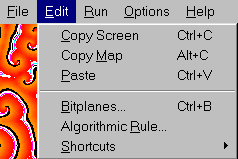
Copy Screen
Copies the contents of the main window to the clipboard as a
device dependent bitmap. You can paste such bitmaps into a
variety of programs, but depending on your display board,
you may not be able to edit the image and paste it back
into the CelLab window without losing the numeric states
of the cells. If you've zoomed or
resized the window, the image placed on the clipboard
will be the same size as that displayed by CelLab.
Copy Map
Copies a Windows 256 color palette-mapped Device Independent
Bitmap (DIB/.bmp) file containing the image in the main
window and the current color palette to the clipboard. If you
want to export a pattern preserving the state and palette
information, this is usually the best choice. The image
placed on the clipboard is always 320×200 pixels, with
each pixel representing a single cell. You can create
a .bmp file containing the image and palette
directly by with the File/Save Pattern/Windows .BMP File
menu item.
Paste
This item is enabled only when the clipboard contains a bitmap
image. Selecting it copies the bitmap on the clipboard
into CelLab's cell map and color palette. If the bitmap on the
clipboard is larger than 320×200 pixels, a 320×200 rectangle from
the center of the clipboard image is used; if smaller, the bitmap is pasted in the
center of the CelLab window. Paste is most useful when a
Device Independent Bitmap (DIB) is on the clipboard. Depending
on your display driver, you may also be able to paste device
dependent bitmaps into CelLab, but the relationship between the
cell values and colors will be whatever the display driver
chooses when translating the image into a DIB, and may not
make sense to your rule program. An alternative to pasting an
image into CelLab is loading a Windows
.bmp file with the File/Load Pattern menu item.
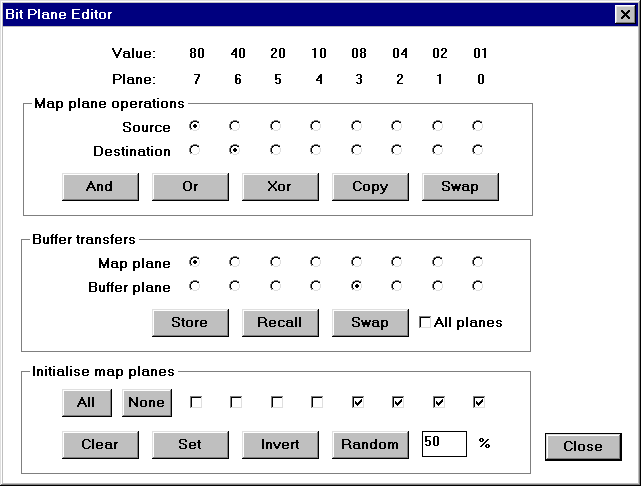
This somewhat intimidating dialogue allows you to perform
various operations on individual or selected sets of
bit planes. At the top are column titles identifying
the eight bit planes and giving the value of each in
hexadecimal. The check boxes in the three areas below
select the bit plane corresponding to the label at the
top of the column. The three boxed sets
of selection and action buttons perform various manipulations
on the bit planes and are discussed individually.
Map plane operations
This field allows you to perform various logical operations
on pairs of bit planes. Before pressing an action button, you
must choose a source and destination plane with the radio
buttons. In the illustration above, the user has chosen
plane 7 as the source and plane 6 as the destination. Pressing
the And button would then replace every bit in
plane 6 with the logical AND of itself and the corresponding
bit in plane 7. The Or and Xor buttons replace
the destination plane with the logical OR or exclusive-or of
its contents with that of the source plane. Copy
sets the destination plane to the contents of the source
plane, and Swap exchanges the contents of the
source and destination planes. Swap is the only button
which alters the source plane.
Buffer transfers
In addition to the cell map used by the simulator, CelLab
maintains a second cell map, the buffer, which
serves as a scratchpad. You can either transfer an
individual plane of the map to or from the buffer, or
by checking "All planes", operate on all planes,
plane-for-plane. Store copies data from the cell map to
the buffer, Recall transfers data from the buffer
to the cell map, and Swap exchanges the contents of
the buffer and cell map.
Initialize map planes
This box allows you to set the contents of one or more
planes to various values. Unlike the Map plane operations
and Buffer transfers boxes, you may select any combination
of planes to be initialized, with All and
None shortcuts provided so you don't have to click
every box on or off if that's what you want. Clear
stores zeroes in the selected planes, Set stores
ones, Invert replaces zeroes with ones and ones with
zeroes, while Random randomizes the selected
planes with the percentage of one bits given in the
percentage box to the right. With the default setting of
50%, about half the bits will be ones; if 25% were entered,
about one in four bits will be a one.
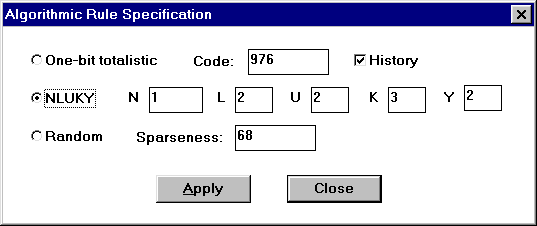
One-bit totalistic rules
Certain categories of rules can be specified in a very
compact form. Totalistic rules
are entirely characterised by a number between 0 and 1023 whose
binary representation describes the new value of a cell based
on the number of one-bit neighbors which are ones. To
generate such a rule, enter its number in the Code
box. If you'd like a one-generation history stored in plane
1, check the History box. Then press Apply
to generate the rule, and return to the main window to
run it. The default rule number, 976, is Gérard
Vichniac's Vote rule.
NLUKY rules
A wide variety of Semitotalistic
rules can be specified by five parameters we call, N,
L, U, K, and Y, so we refer to
them as NLUKY rules. A number of
rules we discuss elsewhere and defined with rule programs can
be generated simply by checking NLUKY,
entering the five parameters in the boxes, and pressing Apply
to generate the rule. NLUKY parameters for various rules are
as follows:
Random rules
Check Random and press Apply to generate a new
random semitotalistic 4 bit rule with the given sparseness,
which specifies the percentage of entries in the rule's
16×9 lookup table which will be zero, on the average. You can
also use the Alt-R shortcut in the main window to
generate a new random rule with the current sparseness. If
you discover an interesting rule by trying random rules,
save it with Edit/Save Rule
or Edit/Save Experiment
so you can try it later with other patterns and
color palettes.
Shortcuts
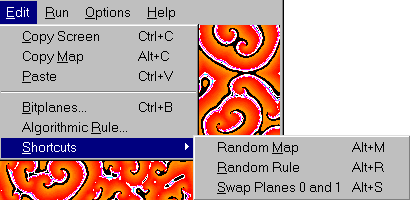 The three items on the shortcuts menu, each with a keyboard accelerator,
perform frequently-used operations without the need to display
and complete a dialogue box.
Random Map
Replaces the current cell pattern with random values in all cells.
The random values obey a uniform distribution between 0 and 255, and
thus have equal probabilities of zero and one bits in each plane.
This Shortcut is useful in conjunction with "order from chaos"
rules such as Vote and
Zhabo, as you can reset them to a
random start at any time by pressing Alt-M.
To randomize selected bit planes with a specified density
of one bits, use the Edit/Bitplanes dialogue.
Random Rule
Replaces the current rule with a randomly-generated 4-bit
semitotalistic rule with the sparseness last set in the
Algorithmic Rule dialogue box, or the default
of 68 if the value in the dialogue box has not been changed. This
item is handy when searching for interesting rules at random--just
keep on pressing Alt+R until you observe some intriguing
behaviour.
Swap Planes 0 and 1
Many reversible rules such as TimeTun
are designed to run in reverse when planes 0 and 1 are interchanged.
To demonstrate this without having to bring up the Edit/Bitplanes
dialogue, use this Shortcut
or just press Alt-S on the keyboard while the simulator
is running. This works only for rules specifically designed to
reverse when planes 0 and 1 are swapped; other reversible rules
such as RevEcoli require more
complex plane swapping which must be performed with the
Edit/Bitplanes dialogue.
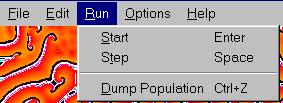 The Run menu lets you start and stop the simulator and, if you've
used File/Population Log to open a
population log file, write the current cell population statistics
to the log. Usually it's more convenient to use the
keyboard shortcuts for the items in this menu; press
Enter to start and stop the simulator, the space
bar to single step, and Ctrl-Z to write the current population
to the log file.
The Options Menu
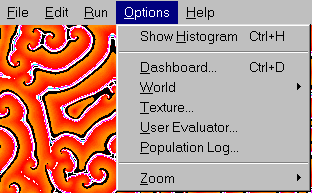
 In some simulations the number of cells in each state is more
important than the pattern on the screen. Show Histogram toggles the
main window display between a display of the cells and a histogram
showing the number of cells in each state, with the bars colored the
same as the corresponding cells in the map. If the color palette
ignores certain planes (for example, those containing texture and
cycle counters), they will not figure in the histogram display. For
more detailed analysis of population statistics, create a
population log file, which records the number
of cells in each state during the simulation.
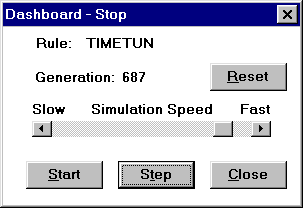 The dashboard is an alternative to starting and stopping the simulator
with the menus or accelerator keys, and allows you to see the number of
generations executed and control the speed of the simulator. The
generation count is incremented every time the rule is applied to update
all cells in the map. Loading a new rule or pattern zeroes the generation
count; you can zero it at any time with the Reset button.
By default, the simulator runs as fast as possible, limited only by the
speed of your computer (and, on multitasking systems, other programs'
demand for processor time). What with the ever-increasing speed of
computers over the years, sometimes the simulation runs so fast you
miss some of the interesting detail. On a fast machine, the
Brain rule sometimes looks like
random snow. The Simulation Speed slider lets you adjust
the time between generations to something appropriate for the
rule you're experimenting with, all the way down to one generation
per second. Due to the architecture of Windows, the fastest
possible speed (slider all the way to the right), is quite a bit
faster than the next slower speed. Also, due to one of the many
flaky aspects of Windows, it's necessary to halt the simulation
when you change the speed. Just press Start to resume it
after you move the slider.
World
The topology of the world and the number of neighbors is usually
specified by the rule definition program and doesn't change
during the simulation. Occasionally however, for example
when experimenting with random rules, you may want to alter
these settings after loading a rule. The Options/World menu
tree allows this, with separate submenus for one- and
two-dimensional world types.
The most common use of this menu is flipping the world from
open (plane) to wrap (torus) on the fly to, for example,
change the boundary conditions for a rule such as
Rug. The Wrap item is checked
if Wrap is currently on, and clicking it changes the
setting of Wrap.
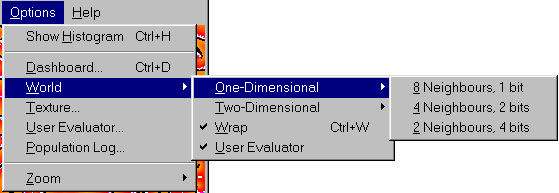
The various types of one-dimensional neighborhoods can be
chosen from the One-Dimensional submenu, with the current
selection indicated by a check. If the simulator is set
to a two-dimensional rule, none of the items on the
One-Dimensional submenu will be checked.
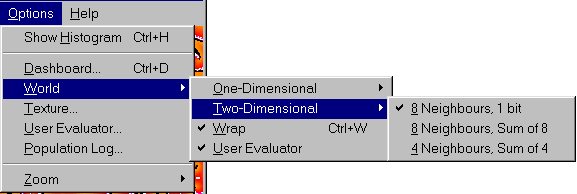
The three kinds of two-dimensional neighborhoods are shown
on the Two-Dimensional submenu, with the current
selection indicated by a check. If the simulator is set
to a one-dimensional rule, none of the items on the
Two-Dimensional submenu will be checked.
Setting the world type to something different than anticipated
in the rule program usually produces uninteresting results, but
can't cause any harm and, who knows, you might stumble onto
something interesting.
The User Evaluator item is disabled unless a User Evaluator DLL
or assembly language own code has been loaded from a
.jco file
either by the rule or from the
File/Load User Evaluator menu
item. If a user evaluator is loaded, it is enabled and checked.
You can't disable a user evaluator except by loading another
rule which does not employ one; trying to uncheck the menu
item does nothing.
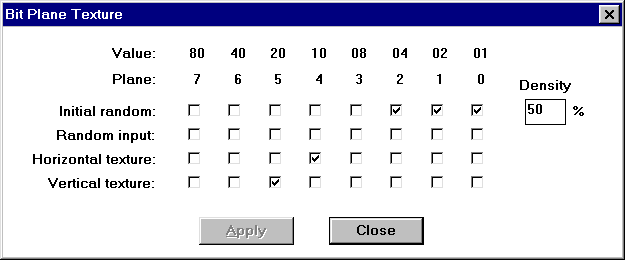 A rule program can request various kinds of Texture to
be loaded into the map and/or fed to the rule as it is running.
The Bit Plane Texture dialogue allows you to view and modify the texture
requested by the. (Often changing
the texture to something other than what the rule expects will
produce useless results, but it can't do any harm and there
are circumstances where, in conjunction with a rule designed
with varying texture in mind, it can be valuable.) There
are four kinds of texture which can be applied to fields
of contiguous bits indicated by check marks in the
various plane columns. Note that each field must consist
of contiguous bits; if you check two or more boxes with
an unchecked box inbetween, you'll receive an error
message when you press Apply and your texture request
will not be accepted.
Initial random
Initial random texture is loaded into the checked planes
when the rule or a new pattern is loaded, but it is not
reloaded thereafter. Initial random textures are most
commonly used to provide random data, for example, the
initial position of particles in a gas, without the need
to include the particles in a pattern file (which would
make it much larger). The Density box controls
the percentage of one bits in the random data and can be
set to any value between zero and 50% (equal numbers of
zeroes and ones).
Random input
Random input causes the the checked planes
to be filled with new random data on each step of the
simulator. This allows a rule to see a continually
changing random data source. Unlike an initial random
texture, the new random data must be generated on every
step, which substantially slows down the simulation.
Unlike the initial random seed, random input provided
as the simulation runs always has an equal probability of
zero and one bits.
Horizontal and Vertical texture
The horizontal and vertical texture fields are used by
rules which need to know the position of cells within
a block of some size. An example of such a rule is
the gas used in the Perfume
rules. The fields checked for horizontal and vertical
texture are filled with values which start with zero
at the upper left of the map and increment by one for
each cell in the corresponding direction, wrapping
around to zero at the given number of bits. The
horizontal and vertical texture fields are allowed to
overlap, permitting the particularly useful case of
"checkerboard" texture where both horizontal and
vertical texture are applied to one plane.
User Evaluator
The User Evaluator item is disabled unless a User Evaluator DLL
has been loaded either by the rule or from the
File/Load User Evaluator menu
item and the evaluator loaded provides a configuration
dialogue. JC-compatible assembly language own code does not
activate this item, only evaluator DLLs. When chosen, the
evaluator's evalConfig
function is called, which usually presents the user with a dialogue
allowing evaluator options to be set. Since the action taken by this
item is entirely up to the evaluator, please consult the documentation
for the evaluator you're using to see what configuration options, if
any, it provides.
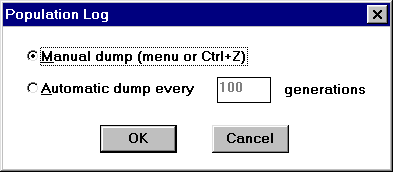
When the File/Population Log item has been used
to create a population log (.jch) file, the Options/Population
Log item is enabled, allowing you to specify the frequency with which
the population is dumped to the log. By default, the population
histogram is written to the log only when requested by the
Run/Dump Population menu item or its shortcut key, Ctrl-Z.
To write the population histogram to the log
automatically at every multiple of a given number of generations,
check Automatic dump and enter the desired interval in the
box then press OK.
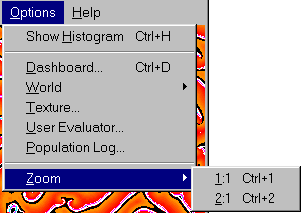 By default, each cell is represented by a single pixel in the
CelLab main window which is thus 320 pixels wide and 200 pixels
high. On high-resolution displays, this can result in the window
and the individual pixels within it being so small that details
of patterns may be difficult to discern. Checking the 2:1
item in the Zoom menu enlarges the window to 640 by 400 pixels
so that each cell is represented by a block of four pixels. This
makes it much easier to see detail but, since four times as many
pixels must be painted for each screen update, substantially slows
down the speed of the simulation. You can, in fact, resize the
main window to any size and shape you like by dragging its corner
in the usual manner, but this is generally a poor idea since it
may result in a non-square representation of cells, distorting
the geometry of patterns and, if the window size in pixels is not
an even multiple of the number of cells, introducing artifacts in
the rendering of cells due to nonuniform replication of
cells in a regular pattern. You can always get back to one
of the standard zoom sizes by choosing it from the
Zoom submenu.
The Help Menu
 Since our documentation is on-line on the Web, the Help menu simply
contains a pointer to this document so folks who have obtained a copy
of the program without any documentation will know where to look. There's
the usual About box with credits and copying information.


 CelLab for Windows is a cellular automata simulator which
runs under Microsoft Windows 3.1,
Windows 95, and Windows NT. CelLab for Windows
is 100% compatible with the JC simulator
for DOS--it uses the same rule, pattern, palette, and
own code files and produces the same results. Running under
Windows allows CelLab to provide some capabilities absent in
JC, including the ability to display the simulation at any
resolution, control its speed, cut and paste
patterns to and from other applications, and generate a sound
track to accompany the simulation. Windows menus and dialogue
boxes replace the keystrokes used
by JC, simplifying many operations.
 The File menu allows you to load and save all rules, patterns, palettes,
own code evaluators, and other files associated with a simulation. Most
of the items display a standard Windows open or save file dialogue,
which you use to specify the location and name of the file.


 The three items on the shortcuts menu, each with a keyboard accelerator,
perform frequently-used operations without the need to display
and complete a dialogue box.
 The Run menu lets you start and stop the simulator and, if you've
used File/Population Log to open a
population log file, write the current cell population statistics
to the log. Usually it's more convenient to use the
keyboard shortcuts for the items in this menu; press
Enter to start and stop the simulator, the space
bar to single step, and Ctrl-Z to write the current population
to the log file.

 In some simulations the number of cells in each state is more
important than the pattern on the screen. Show Histogram toggles the
main window display between a display of the cells and a histogram
showing the number of cells in each state, with the bars colored the
same as the corresponding cells in the map. If the color palette
ignores certain planes (for example, those containing texture and
cycle counters), they will not figure in the histogram display. For
more detailed analysis of population statistics, create a
population log file, which records the number
of cells in each state during the simulation.
 The dashboard is an alternative to starting and stopping the simulator
with the menus or accelerator keys, and allows you to see the number of
generations executed and control the speed of the simulator. The
generation count is incremented every time the rule is applied to update
all cells in the map. Loading a new rule or pattern zeroes the generation
count; you can zero it at any time with the Reset button.


 By default, each cell is represented by a single pixel in the
CelLab main window which is thus 320 pixels wide and 200 pixels
high. On high-resolution displays, this can result in the window
and the individual pixels within it being so small that details
of patterns may be difficult to discern. Checking the 2:1
item in the Zoom menu enlarges the window to 640 by 400 pixels
so that each cell is represented by a block of four pixels. This
makes it much easier to see detail but, since four times as many
pixels must be painted for each screen update, substantially slows
down the speed of the simulation. You can, in fact, resize the
main window to any size and shape you like by dragging its corner
in the usual manner, but this is generally a poor idea since it
may result in a non-square representation of cells, distorting
the geometry of patterns and, if the window size in pixels is not
an even multiple of the number of cells, introducing artifacts in
the rendering of cells due to nonuniform replication of
cells in a regular pattern. You can always get back to one
of the standard zoom sizes by choosing it from the
Zoom submenu.
 Since our documentation is on-line on the Web, the Help menu simply
contains a pointer to this document so folks who have obtained a copy
of the program without any documentation will know where to look. There's
the usual About box with credits and copying information.